Recording Method (For YouTube Cover Videos)
This section describes the method I used to record most of my cover videos in the period 2007-2008. In summary, I used my PC sound card to capture the processed guitar output from my Line 6 POD (2.0, and later X3) in a program called Audacity. If I were to record new cover videos today, I would use my POD X3 (or other device such as Focusrite Scarlet 2i2) as an external (USB) audio interface with a Digital Audio Workstation software such as REAPER. This is similar to how I recorded my originals “Arrival” and “The Rising”. In any case, a method similar to the one described in this section could still be used by someone without an external audio interface to get results much better than what could be achieved simply by using a camera or phone microphone.
Recording guitar audio directly to the computer has two distinct advantages over using the camera microphone (or other microphone) to capture sound from an amplifier and/or computer speakers. First, the quality of the directly recorded audio will generally be better—much less noise, more of the audible frequency range is captured, etc. Second, it allows you to record an audio track for your instrument that is completely independent of the backing audio, so you can adjust the volume levels of your guitar and original song until you achieve the desired mix. (You could do this with a microphone, but you’d need to wear headphones while recording over the original song). For best results, an amp modeler with some type of speaker cabinet / microphone / room acoustics emulation is required. These devices will output a signal that is supposed to mimic what you’d get by using a quality microphone to properly capture the output of an expensive tube amplifier cranked up and played through a speaker cabinet. For the money, I think the Line6 POD does a pretty good job and modeling devices and software have improved quite a bit over the years. If you attempt to use an effects pedal that lacks this emulation (think stomp box or an old effects board without modeling capability), or the line out jack of a dedicated (non-modeling) guitar amplifier to record directly, you will probably be disappointed with the results. The tone will sound very harsh and fizzy (Note: in a few of my early cover videos I had the speaker cabinet emulation on my POD 2.0 turned off, resulting in this harsh and fizzy sound. Don’t do this!). A detailed description of my recording method is given below. Note: At the time I was using this method, I had a PC running Windows XP with a Sound Blaster card. Most of the detailed instructions and screen captures will not apply to modern computers running Windows 7/8/10, but it should be possible to achieve something similar with a bit of fiddling around or searching the web.
My Recording Equipment and Software
-
Line 6 POD X3 andLine 6 POD 2.0 (now sold): Guitar amp modeler / effects processor / speaker cabinet emulators)
- PC with Windows XP SP3. Intel Q6600 CPU (overclocked to 3.4 GHz), 4 GB RAM, ~1 TB hard drive space, Creative Labs Sound Blaster Audigy 2 Platinum ZS sound card.
- Audacity software (free digital audio editing and recording application).
- Windows Movie Maker software (basic movie creation / editing software included with Windows XP Service Pack 2). Note: If your PC is running Windows XP with Service Pack 2, you have this software installed already, unless you removed it. (Note: I believe Windows Movie Maker was discontinued after Windows XP. There should be other free video editing programs that can do the trick for Windows 7/8/10.)
- Cables: Guitar (instrument) cable, and adaptor cable to connect Line6 POD to Sound Blaster Audigy 2 ZS Platinum front panel .
- Cameras: I used a Sony DSC-H9 digital camera to record video for all of my covers and for my original song "Arrival". For my other original, "The Rising", I used my new Canon HF100 high definition camcorder.
The type of adaptors/cables you need to connect your guitar to your computer depends on your guitar signal processing equipment as well as the inputs available on your computer’s sound hardware! Most manufactured computers, e.g. Dell, HP, Gateway, will have onboard audio with 1/8” jacks for headphones, microphone, and possibly line in. To connect a POD (or similar device) to a computer with an 1/8” line in jack, you could use a 1/4” to 1/8” cable cable (or adaptor). For a stereo connection from a POD (or equivalent), you could use a cable with two 1/4” males on one end, and one 1/8” male on the other. Here's one on Amazon
Please note that there are many other ways to make these connections (combinations of male and female adaptors, all-in-one cables, etc.), and I am just giving some simple suggestions.
My Step-by-Step Process for Recording Guitar Cover Videos
1. Make the proper connections to send the guitar signal to the computer.
The details of making connections will vary a bit from person-to-person depending on equipment, computer hardware, etc. In my case, I simply connect my guitar to the Line6 POD via a standard instrument cable, and I connect the left and right outputs of the POD to the stereo RCA inputs on the front panel (drive bay box) of my Sound Blaster Audigy 2 Platinum ZS. I use a cable with two 1/4” male plugs on one end and stereo RCA plugs on the other .
2. Choose the appropriate recording input and set recording volumes in Windows.
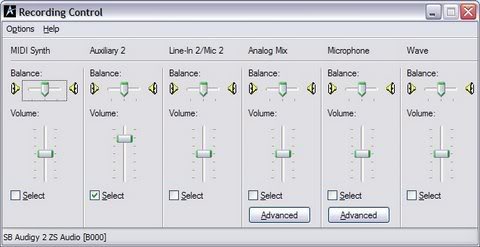
Once the proper connections are made, it may be necessary to configure your sound hardware (sound card or built-in motherboard audio) to capture audio from the correct input, and to set volumes for recording and playback. In Windows XP, you should be able to access the volume controls and select a recording device by going to Start > Control Panel > Sounds and Audio, and then clicking on the “Advanced” button in “Device volume” section. This will bring up a window with volume sliders for various audio sources for the computer, as shown below. This window may look different on your computer depending on what type of audio hardware and drivers you have installed. Make sure that the input you plan to use for recording is not muted. Otherwise, you won’t be able to hear your guitar signal through the computer while recording. If you are not using the microphone input, it is a good idea to mute it to eliminate any noise associated with the mic preamp. At this point, you should be able to hear your guitar through your computer speakers or headphones.

Next, in the volume control window, go to the Options menu and select Properties. This will bring up a window with sliders to control the recording volume, as well as check boxes to choose the recording device. Make sure the input you plan to use is selected by enabling the appropriate checkbox. In my case, Auxiliary 2 is the stereo RCA input.
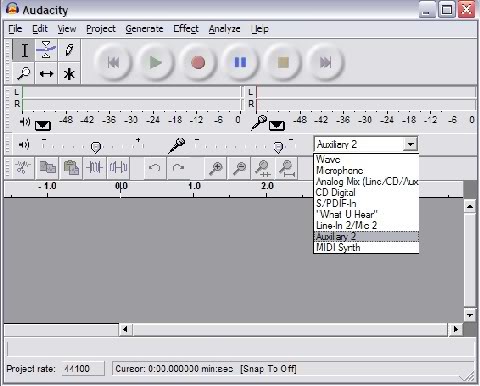
Finally, you should set the recording volume appropriately. (It is important to note that playback / monitoring volume is independent of recording volume.) You need to make sure you set the recording volume such that it is not clipping (distorting) the input while not being too weak. The playback volume can be adjusted to your liking after the recording volume is set. To set the recording volume, launch Audacity and start a new project. Make sure the proper recording device is set in the pop-up menu as shown below.
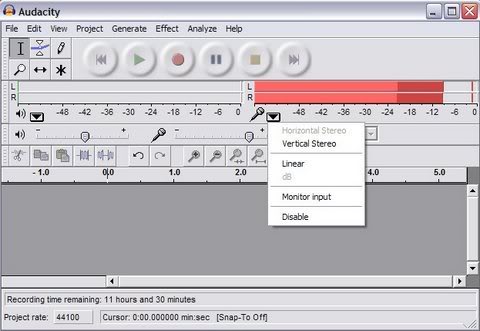
Then, click on triangle icon next to the microphone icon and select “Monitor input” from the menu. You should now see a level indicator bar when you play your guitar. Adjust the slider next to the microphone icon to adjust the recording volume. The level should never hit “0”. I usually try to keep the volume at about –3 as a maximum. Keep in mind that you can always amplify your recorded guitar signal if you need more volume in the mix.
3. Import Backing Song into Audacity, Adjust Monitoring Volume Levels, and Record!
Import the desired song into Audacity by going to File > Open, and selecting a .wav or .mp3 file. Once the song is loaded, press the play button, and play your guitar along to the song to check the relative volume levels. If either the song or your guitar is too loud, you can adjust the volume levels using the Windows playback volume mixer described in Step 2 (Note: Make sure not to change the recording volumes!). Once you get an acceptable playback (monitoring) mix, you are ready to record your guitar track.
At this point, I set up my camera so that I am recording the video at the same time as the audio. I press record on the camera, then I press the record button in Audacity, and off I go! If you did everything correctly, you should see a new, separate audio track from your guitar recording underneath the original song. (Important! If you can’t hear the original song while recording your guitar, go to Edit => Preferences, switch to the “Audio I/O” tab, and make sure to check the box labeled “Play other tracks while recording new one”). Once the song is over, stop the camera and press the stop button in Audacity. Return to the beginning of the song in Audacity and press play to listen to the mix. You can make +/- 3 dB adjustments to the volume of the original song and your guitar track by using the gain slider to the left of each track. To make even finer adjustments, I suggest using the envelope tool (refer to Audacity help).
Once you achieve a recording mix that you are happy with, export the project to a 16-bit .wav file. You may need to go to Edit > Preferences in Audacity first, and set the Sample Rate to 44,100 Hz in the Quality tab, and set the “Uncompressed Export Format” to “WAV (Microsoft 16 bit PCM)” in the File Formats tab. To export the .wav file, go to File > Export as WAV.
4. Creating the Movie in Windows Movie Maker.
Start Windows Movie Maker (you should have this installed if you have Windows XP Service Pack 2). Under step 1 of the “Movie Tasks” pane on the left, click on “Import video”, and find the video file that you recorded on your camera or webcam. The video clip will appear in the “Collection” box in the center. Drag the video clip onto the timeline at the bottom. If you are given the option to “split” the clip into different segments automatically, do NOT do this, as it will make editing more difficult. You will now see the video and audio (from the camera) in the timeline. If there is audio in your video file from the camera microphone, right-click on the audio track and select “Mute”.
Next, import the .wav file you exported from Audacity by clicking on “Import audio or music” under step 1 of the Movie Tasks pane. The .wav file will appear in the collection box. Drag this file into the timeline. If you want to add titles or credits, make sure to do it now before you start to synchronize the audio and video. Otherwise, you’ll have to do it over again. To synchronize the audio and video, it is easiest to zoom in on the timeline as much as possible (use the magnifying glass icon with the + symbol). Find the spot in your video when you play the first note, and try to align the audio waveform with it by clicking on the audio track and dragging it to the left or right. Press the play button to see how well the audio and video are synchronized. If it’s still off, make fine adjustments to the position of the audio track by dragging it 0.1 seconds forward or backward. It may take a bit of practice, but you should be able to get it very close.
Once you are happy with the video, save the movie project and export it as a compressed movie format (I use the default .wmv). To do this, click on “Save to my computer” in step 3 of the Movie Tasks pane. Enter a filename and location for the file, and press next. In the “Movie Setting” options, I usually just choose the “Best fit to file size” option, and leave the default size specified by the program. (Remember that YouTube has a file size limit of 100 MB). Press next, and your movie will be saved to your hard drive. Once it is finished, you are ready to upload the video!
I hope you find this guide helpful! Feel free to send me a message on YouTube if something is unclear or not working for you.